As a follow on from the GDPR For Non-production Environments post and to give an insight in how to use the basic functionality of Delphix Masking I thought I would write this post in the format of a demonstration. It’s a demo I give to the DBA’s and Application Specialists that attend the Delphix training courses I teach before they get their hands dirty and do it themselves in the labs.
Warning: this is a very screenshot heavy post!
For this demo I am using a simple order entry schema in an Oracle database (which comes as part of the Swingbench load generator tool produced by Dominic Giles. Huge thanks to Dominic – I’ve been using Swingbench for all kinds of things for years!) and the schema contains plenty of columns that could contain sensitive data, so perfect for a simple demo.
Let’s start with a quote from the official docs:
Data Masking, sometimes called de-identification or redaction, is a technique used to secure your sensitive data in non-production environments such as Development and QA by replacing sensitive data with fictitious but realistic data, eliminating the risk of exposing your sensitive data to unauthorized parties. Delphix’s unique approach to data masking involves breaking the logical association between unique identifying information (for example, social security numbers) and personally identifiable data (for example, name and address).
So let’s work through the steps required to de-identify the data using Delphix in our pretend application.
Define Application/Environment
First we add an Application, which would be the name of the Application containing the data we’re working on. I’ll call mine Order Entry. Then we add the Environment, which defines the scope of work in Delphix, an example being Development. The Environment holds the configuration information we’re about to provide such as connections and masking rules.
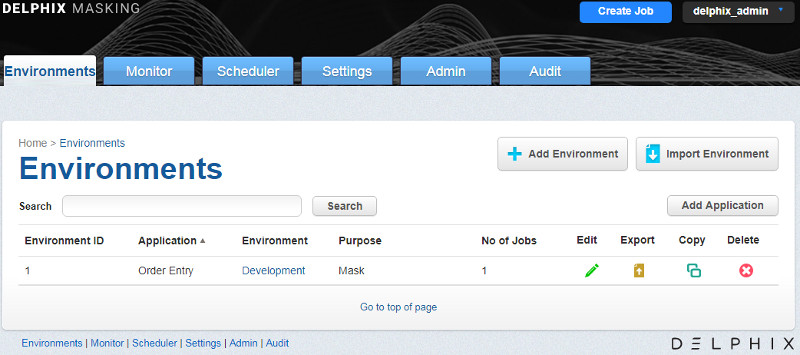
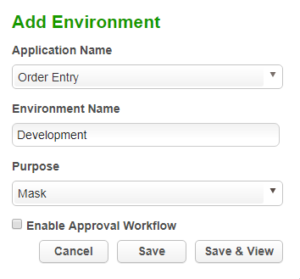
It’s as simple as clicking the Add Application button and giving it a name, then Add Environment button and giving that a name, selecting the Application we’ve just created and picking a Purpose.
Create Connection
Click into the Environment and we have four tabs to work with where we perform the rest of the process. The second tab takes us to the Connector screen in which we can define the connection to the database or file we want to mask. Click the Create Connection button and pick the type of data source to work with, in our case Oracle.
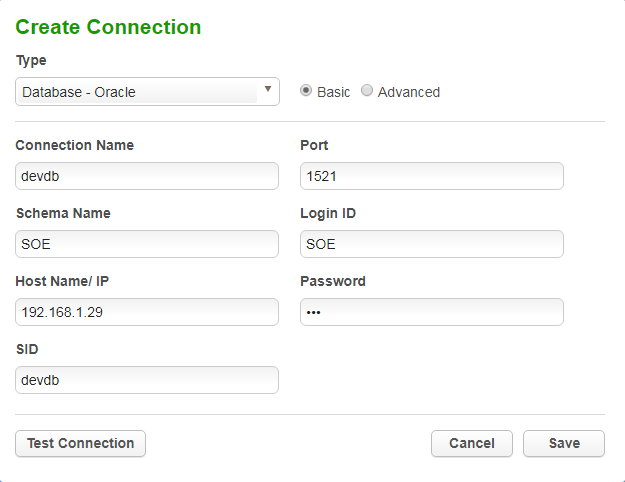
The information to provide here is all the standard stuff you would expect (the Schema Name and Login ID could be different and often will be, a further note on that in the next step). Make sure you Test Connection before saving.
Create a Rule Set
A Rule Set is a collection of tables (or files) that we define as our targeted datasets for masking. When creating a ruleset Delphix will present us with a list of tables where we then pick which ones (or all) we want to work with. It’s important to note that we have to ensure the Login ID we configured in the connector has the correct privileges in place otherwise the tables won’t be listed. In this case the Login ID is in fact the schema owner but often this won’t be the case. Refer to the official docs here to see the privileges required.
Click the Create Rule Set button
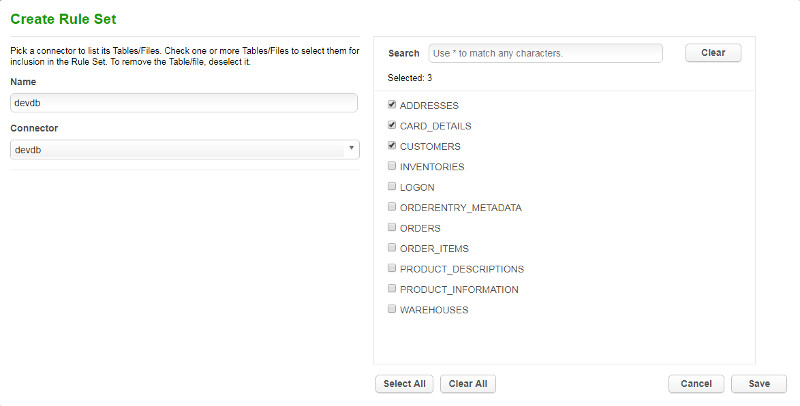
Give it a name and choose the Connector we created previously. Now you will see all the tables our user has access to and we can select the ones we know or suspect contain sensitive data.
Define the Inventory
The Inventory is where Delphix stores the masking rules. After creating a Rule Set there is an empty Inventory and it is up to us to populate this with the masking rules for each sensitive column. We have two options here, define the masking rules manually or let the Profiler do it for us.
Click the Inventory tab and browse the empty Inventory
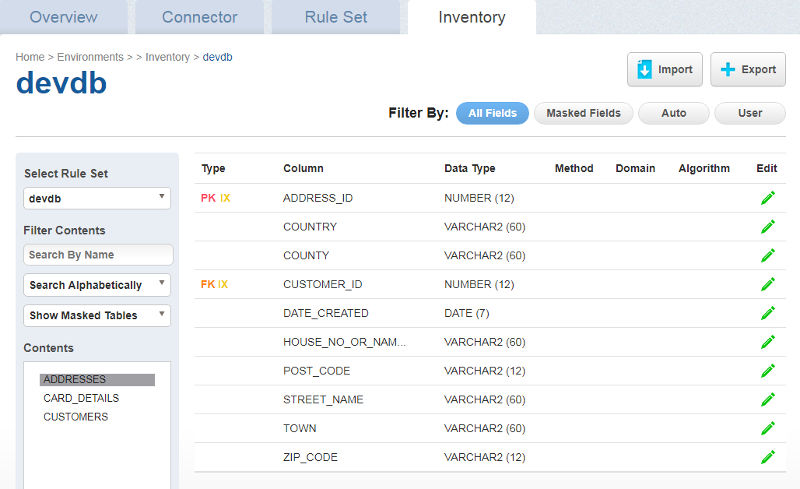
Ensure our Rule Set is selected on the left side and it will show the tables in the Rule Set and columns for the selected table in the main section. As we can see here the Method, Domain and Algorithm columns are empty. These are what we need to populate to define our masking rules.
Profile the Data
A major component of Delphix Masking is the Profiler, which is used to help determine the sensitive data columns in our Rule Set and automatically apply masking rules to those columns. It updates the Inventory (the three columns that are empty right now) with what it determines are the best algorithms to use. The Profiler works out of the box with some predefined regular expressions or you can add your own.
Back on the Overview tab in our Environment click the Profile button to define the profile job.
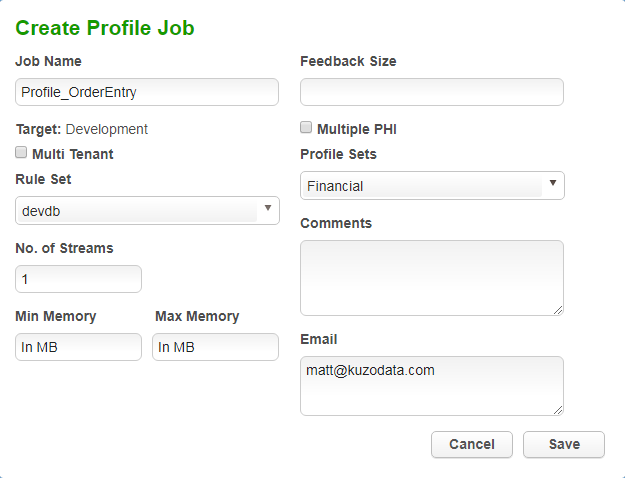
The minimum information needed to define the job is a Job Name, the Rule Set and a Profile Set – out of the box we have a choice of Financial and HIPAA (Health Insurance Portability and Accountability Act).
Once the job is saved we can run it by hitting the play button in the job list. Once completed click on the job name to see the results.
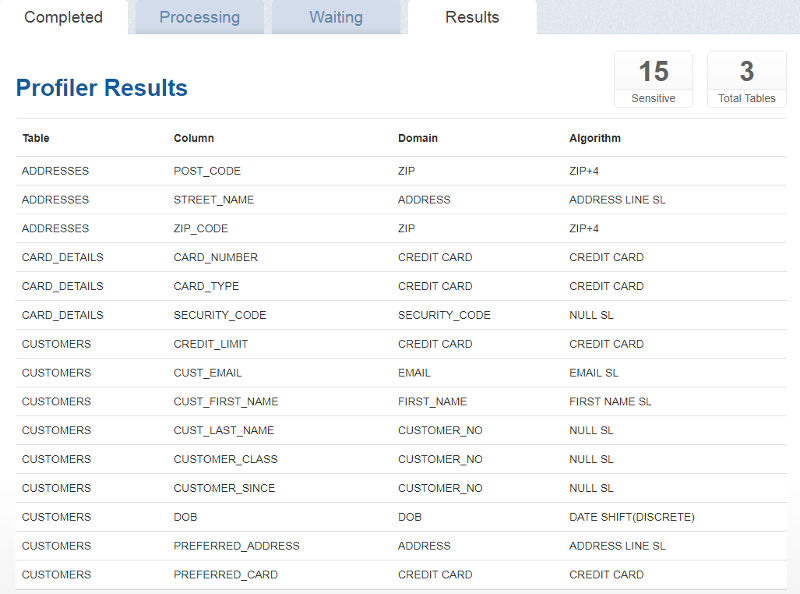
We can see for our Rule Set the Profiler has picked up 15 potential sensitive columns.
Edit Inventory
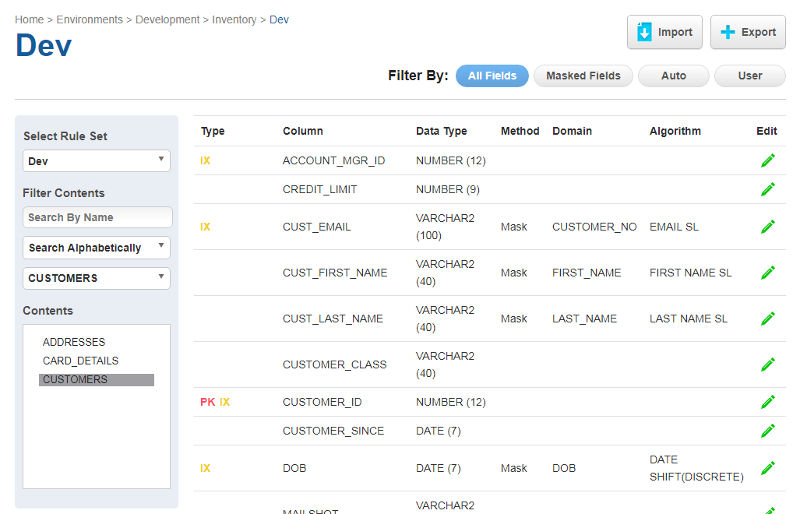
Go back into the Inventory tab and we now see some masking rules defined. The Profiler may or may not have picked up all the sensitive columns (this depends on the profile set used so it is important to ensure you create a quality set of expressions for your data) or even marked columns as sensitive that aren’t. You need to know your data here.
We’re just using the Financial profile set and it’s done a decent job but I want to change it, specifically I want to remove some columns that I know not to be sensitive and change the algorithm for the CUST_LAST_NAME column to LAST NAME SL. To remove a rule just click the pencil in the Edit column and remove the domain. To change a rule click the pencil and change the algorithm to the one you want.
Mask Data
Now we have an inventory we are happy with we can go ahead and perform the masking itself. Click into the Overview tab again and click the Mask button to create the masking job.
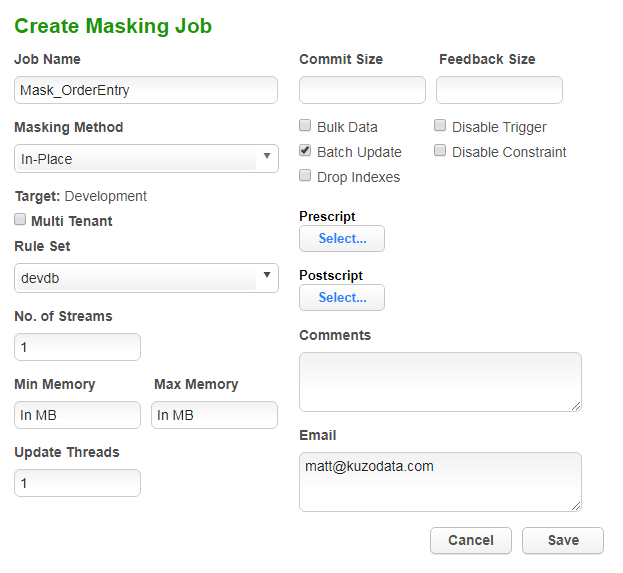
The minimum we need to provide here is a Job Name, the Masking Method and the Rule Set. Click Save and we’re ready to go.
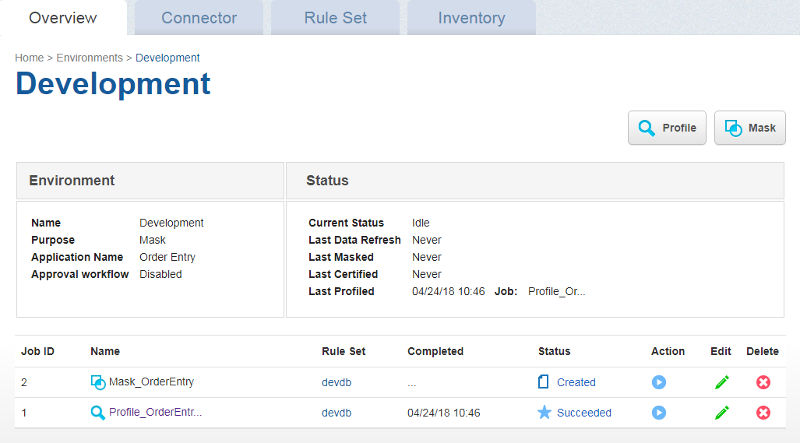
Before we run the job lets take a look at the data in our pretend application before masking, so we can compare it to the post-mask data.
The first 19 rows of the CUSTOMERS table:
CUST_FIRST_NAME                CUST_LAST_NAME       DOB       CUST_EMAIL
------------------------------ -------------------- --------- ------------------------------
brandon                        gomez                23-MAR-52 [email protected]
armando                        mccoy                05-MAY-94 [email protected]
eddie                          olson                08-OCT-82 [email protected]
larry                          perez                07-OCT-75 [email protected]
larry                          perez                28-DEC-99 [email protected]
edwin                          mendoza              20-JUN-54 [email protected]
oscar                          gordon               18-DEC-54 [email protected]
charlie                        elliott              01-FEB-76 [email protected]
leon                           stone                08-OCT-93 [email protected]
maurice                        kelley               05-APR-63 [email protected]
salvatore                      moss                 07-NOV-79 [email protected]
bernard                        henry                30-MAR-71 [email protected]
marcus                         crawford             15-SEP-90 [email protected]
larry                          perez                09-OCT-64 [email protected]
zachary                        stephens             25-JUL-73 [email protected]
michael                        brown                17-FEB-53 [email protected]
jim                            hunter               14-DEC-61 [email protected]
derrick                        fernandez            06-JUN-89 [email protected]
grant                          park                 17-AUG-98 [email protected]
Click the play button and monitor progress of the job by clicking the job name, which will take you into the Monitor screen where you see a progress bar and various statistics.
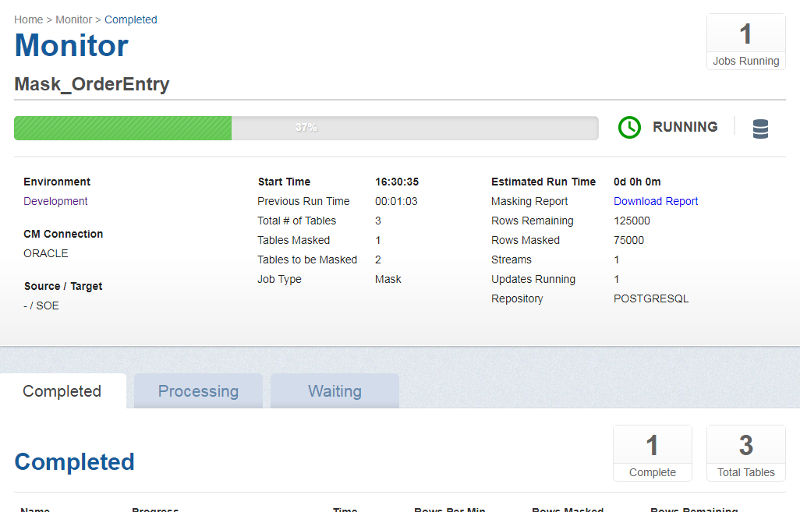
Now lets look back at our tables to see the resulting masked data.
The same 19 rows of the CUSTOMERS table:
CUST_FIRST_NAME                CUST_LAST_NAME       DOB       CUST_EMAIL
------------------------------ -------------------- --------- ------------------------------
Erna                           Pellyn               25-MAR-52 [email protected]
Echo                           Granger              24-MAY-94 [email protected]
Phylis                         Alfred               29-OCT-82 [email protected]
Blake                          Hainsworth           25-OCT-75 [email protected]
Blake                          Hainsworth           20-DEC-99 [email protected]
Latia                          Hazard               09-JUN-54 [email protected]
Delmer                         Skidmore             23-DEC-54 [email protected]
Deana                          Amherst              26-FEB-76 [email protected]
Joyce                          Stapleton            31-OCT-93 [email protected]
Bethel                         Chickering           29-APR-63 [email protected]
Donald                         Trevelyan            29-NOV-79 [email protected]
Camilla                        Campbell             07-MAR-71 [email protected]
Coretta                        Sellick              22-SEP-90 [email protected]
Blake                          Hainsworth           27-OCT-64 [email protected]
Jeremiah                       Holcombe             17-JUL-73 [email protected]
Delfina                        Channing             01-FEB-53 [email protected]
Latonia                        Bard                 31-DEC-61 [email protected]
Altagracia                     McGooken             21-JUN-89 [email protected]
Sarita                         Acton                27-AUG-98 [email protected]
This is exactly the kind of data I expected according to the algorithms I chose. The algorithm on the DOB column will just change the day part of the date and the email algorithm I used is a Secure Lookup and therefore will replace the data with fictitious data from a list file. The same goes for the first and last name columns. Success. We now have a masked database using fictitious but useful data.
This was a fairly crude and simple demo and there is much more we can do with the Delphix Masking tool but hopefully it gets across the message of how simple the process can be and with no coding knowledge required. In fact the latest version of the Masking Engine includes a super simple wizard that will take you through all but the profile section of the process I’ve described above. And for those with coding knowledge there’s even a new API client that makes learning the API a relatively quick process so you can be building masking automation in no time.
Do bear in mind though, the pretend application we’ve masked in this demo is also super simple and most enterprise applications are far far more complicated. I’ve seen databases with huge schemas (1000’s of tables) and not a single descriptively named table or column (a form of obfuscation itself). Even though the masking profiler will look at data as well as column names it will never be 100% guaranteed to pick up everything perfectly accurately. I’ve said it earlier and I’ll say it again, you need to know your data!
Click here for information on data masking training courses provided by Kuzo Data.

Matt is a technology consultant with over 20 years experience helping organisations around the world achieve data success using proven and emerging technologies. He is the Principal Consultant and Head Trainer at Kuzo Data.
Connect with Matt on LinkedIn.